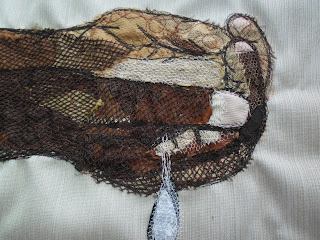
Recently Brother NZ announced that they had a quilt challenge to make a quilt 70cm square for their Eco challenge. I decided to enter this and thought about it for a few weeks before deciding I wanted to make a quilt about water. Here is my step by step process in case you are interested.
I chose to use fabrics that were left over from previous quilts and from the curtain samples that I quite often buy, so it was very 'eco' by using up these scraps etc.
I started by drawing a design onto paper and then cutting a piece of curtain fabric big enough to attach the scraps to. I started with the hands, because if they didn't work out I didn't want to waste time on the rest.
I laid down (pinned them all) various brown and cream/tan shades of fabric scraps with an overlay of brown mesh fabric and stitched it all in place. Very happy with the look of these so next made the rusty tap.
I used a shiny coppery coloured curtain fabric that had a look of rust to it and then added bits and pieces to create a more rusty look. I found one of the curtain fabrics had this stitched line with thicker threads that was ideal to use at the base of the tap to create the illusion of nuts, joins etc. Then I laid black tulle net over the top, pinned it all and stitched 'scribble' style over the top.
Then I added the puddles underneath the hands and tap with blue curtain fabric, then some greys and creams plus a cream tulle net. Then I started adding random scraps of golds, browns, tans, then a layer of yellow tulle (I wasn't going to use that yellow for anything else). As I went up from the ground area to the sky area I used lighter fabrics. Again I 'scribble' stitched allover to hold these fabrics in place.
You will just see in the bottom right of the picture above my cat had to get in on the act. If I have a quilt on the floor he has to give his seal of approval and sit or lie on it. Now I added batting and backing and machine quilted, adding detail and texture to the quilt.
Once I got this far I decided to add some stencilled words. I cut a freezer paper stencil on my Brother Scan N Cut machine and ironed it over the quilt top, then used black textile paint to paint over the stencil. Lifted the freezer paper off and was very happy with my words.
To finish I decided to stitch a 'magic binding' - this is using 2 fabrics, an accent 1 3/4" and a main 1 1/2", sew them together lengthwise, fold over and press which creates an 1/8" of the accent showing above the main fabric. Stitch to the back of the quilt, fold over to the front and stitch using invisible thread in the ditch between the accent and main fabrics. So quick yet so effective. Also made it easier for me as I had used curtain fabric for the main and homespun for the accent, it was a little bulkier than I normally have.
And here is the final product which I am pleased to say won a Highly Commended from Brother NZ, I have just received a lovely certificate and a box of machine embroidery threads. Thank you Brother. Now to see what happens in Japan with all quilts sent in from around the world.
Dianne


No comments:
Post a Comment